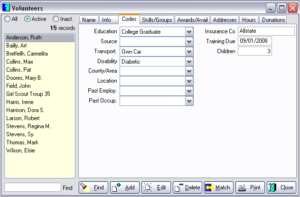
This page covers setting up custom Volunteer codes for version 5.9 and previous. The procedure is similar for Station and Job codes. In version 6.0 Volunteer codes are set up from the Field Lists on the File menu.
The Volunteer Reporter’s manual covers much of this, accessed from Reporter | Help menu | Reference Manual | Reference | Custom Codes
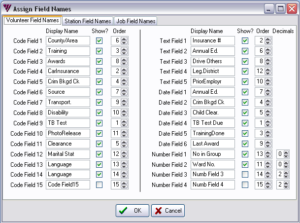
The Reporter enables many customizable code fields in Volunteers, Stations and Jobs to suit your organization’s unique needs. In the Volunteers section, 15 customizable drop-down fields and a combination of 15 total text, date and number fields provide the ability to record unique data you would like to track. Codes are additional ways to categorize volunteers, stations, and jobs beyond the Reporter’s built in categories. In the Reference Codes section of the Volunteer Reporter, you can edit codes, add new ones, delete unused ones, and print lists of them. Codes are totally optional and can be hidden from view if they are not used.
- Left column: 15 drop-down code fields
- Right column: 5 text fields
- Right column: 6 date fields
- Right column: 4 number fields
All codes on the Codes tabs in Volunteers, Stations, and Jobs can be changed by you to match your needs. The Reporter installs with some sample codes to get you started, but you can change them or make new ones at any time. Or clear them all to start with a clean slate.
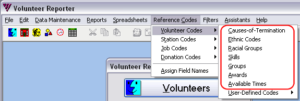
The Reference Codes menu also displays fixed fields that show on the Info tabs in the Reporter. For those you have total control of their values, but not their Labels. For instance, you can add, edit, and delete the values of Causes-of-Termination but that field will always be called Causes-of-Termination.
The menu items encircled in red have fixed labels you cannot re-label.
Assign Field Names
You can label and customize all the User-Defined Codes, including hiding those you do not need. Begin by assigning field names.
The last menu item here,
“Assign Field Names”, is where you change what each code category means. This is also where you assign field names for the other fields in Volunteers, Stations, and Jobs that are not codes, but still user definable.
By removing a check mark in the “Show?” column, you prevent that field from appearing on the volunteer, station, or job screen. Since we supply so many user defined fields, you’ll probably want to turn unused ones off in order to keep your screens less cluttered.
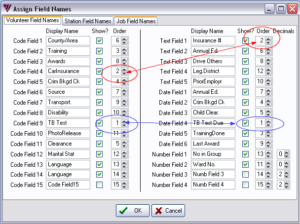
In the “Order” column you specify which user defined field should be shown first, second, third, etc. on the page. You can use this to more closely match a paper intake form, for example. The user defined code fields will always be shown in the left hand column while the user defined text, date, and number fields will always be shown in the right hand column. You can’t move them from one column to the other, only specify the order within one column.
On the Reference Codes, Assign Field Names screen the codes stay in the same place, but on the Volunteers Screen the display in the order you define.
If you still have the Volunteers screen open during your Reference Code changes for volunteers, you must close it and reopen it to refresh the screen in order to see your changes. Then you can click Edit to expand the drop-down list to choose a value.
Sometimes you might have a user defined code field in the left hand column that is related to a user defined date field in the right hand column. An example might be an immunization record code field and a immunization due date. In this case, you can assign each one the same order in their respective columns so they will be aligned next to each other. Paired codes must start at the top of the columns.
For user defined number fields you can specify the number of decimal places to use. This can be handy if you are using one of them to keep track of a whole number that will never contain fractions like the number of children that a volunteer has. A comma will always separate the thousands no matter how many decimal places you specify.
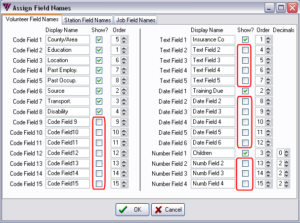
Unchecking Number Field 4 in Assign Field Names hides it on the Volunteer, Info tab.
Hiding Unused Codes
Senior Corp [CNCS] organizations often find the Reporter already tracks most of the Corporation’s requirements. Simply unchecking unused codes can make the screen easier to work with. Here are some sample codes like the few additional codes they may want to add or adapt.
Here the unused ones are unchecked.
And this is the tidy result.
Assigning Code Values
After you have labeled the code fields, add values to the drop-down codes.
Volunteer Reporter |Reference Codes | Volunteer Codes | User-defined Codes | Select the appropriate code from the menu list
Click add.
Type the value. Click OK. [The blue bar lets you know when you have reached the limited number of characters.]
Close the codes screen when you have added, edited, or deleted the values satisfactorily.
Reminder: If you still have the Volunteers [or Stations, or Jobs] screen open during your Reference Code changes for volunteers [or Stations, or Jobs], you must close it and reopen it to refresh the screen in order to see your changed codes and values. Then you can click Edit to expand any drop-down list to choose a value.
Deleting Codes
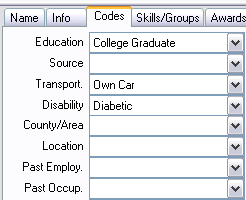
Besides adding new codes, you can also change existing codes to match your needs. For example, the Volunteer Reporter comes to you with sample codes for Disability. If you are never going to use this type of code for volunteers, you can change the entire category “Disability” to something completely different like “Marital Status.”
Before you re-label the field, navigate to the Disability User-defined code to delete the Disability code’s values. Highlight each item and press the delete button.
Highlight each item and press the delete button.
Deleting Codes That Are In Use
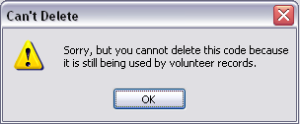
You cannot delete a code if it is being used elsewhere.
For example, if some volunteers still use the value Radio for a code called Source to designate a particular source of referral, you cannot delete that code value until you remove it from all the volunteer records which use it. In order to find out which records still refer to a particular code, create a filter that selects just the Radio value for that code. Use the filter with a simple report like Volunteer Address List so that you can identify from which records to remove the code value.
In a volunteer’s record, click the Edit button ![]() , click the arrow to open the list, and set the selection to the blank at the top of the list.
, click the arrow to open the list, and set the selection to the blank at the top of the list.
Starting with a Clean Slate
Health care organizations which track a lot of specialized volunteer information many want to eliminate all the sample codes that came with the Reporter and engineer your special tracking with a clean slate. To do that, rename all the used fields back to their original labels, for example, Code Field 1. Highlight or clear the existing label and type Code Field 1 in its place, and so on sequentially down the list.
Delete the values for any of the renamed codes.
While you are at it, set all the spinners in the Order column, the little up and down arrows, to number sequentially 1-15. Then take your list of special things you want to track and rename all the codes. Set the order so that the most frequently used will be at the top. Or perhaps you want to pair up certain drop-down codes on the left with date codes on the right. In that case, give the pair(s) the topmost position(s).
Now you can set up your codes from your organization’s list of special items to track.


