Web Assistant Setup for Volunteer Centers
Most of this information is in the Volunteer Reporter Manual:
Volunteer Reporter | Help menu | Reference Manual (pdf)
Volunteer Reporter Web Assistant Concept
Concepts: There are two sides to the Web Assistant, the front side and back side. Your volunteers and supervisors see the front side while you control everything from the back side. You access the back side from within the Volunteer Reporter using the Web Assistant screens. When first getting started with the Web Assistant, your main focus will be the Settings screen. On a regular basis, you’ll use the Send & Receive wizard to communicate with the Web Assistant server. Data that you receive from the server will be put on the various tabbed screens, New Hours, Applicants, Placements, and Messages.
Settings: The settings you choose affect how your volunteers and applicants see and interact with the Web Assistant. You use these settings to tell the Web Assistant how to look and feel to people who visit it. For example you pick the graphic you want shown on the Web Assistant, you choose whether to ask new applicants for their birth date, and adjust what messages your volunteers receive when they can’t remember their password. Without knowing the first thing about designing web pages, you can make selections to quickly and easily change the interface your volunteers see.
Volunteer Reporter Web Assistant Settings
Click the Settings button in the Web Assistant “back end,” in the Reporter.

General Tab
Fill in the fields on the General tab according to the explanations below.

ID Numbers: We assign you these numbers. They identify you to the Web Assistant server. Each dataset needs unique ID numbers. The 01 stands for the first database. Additional subscriptions for additional databases use the next higher numbers.
Password: You give us a password when we set up your Web Assistant account and it stays visible in your settings.
Organization Name: The name of your organization that will be displayed on the web pages your volunteers see.
Bitmap Graphic The name of a header graphic file that will be automatically inserted at the top of every web page your volunteers see.
Home Page: The web address of your home page. This doesn’t necessarily have to be your home page, but the page you want people to see whenever they press Home while using the Web Assistant.
Station supervisors enter hours: Station supervisors can enter hours for their volunteers
Volunteers and supervisors can change their password: Whether you want volunteers to be able to change their own username and password. If not, they have to contact you whenever they want to change their password.
Volunteers can use the default password: When your volunteers are first getting started with the Web Assistant, it can be handy to allow them all to sign in once with a default password before choosing their own. Otherwise, you have to tell each volunteer their password.
Default Password: The default password they can use.
File Transfer Timeout: The number of seconds to wait when communicating with the Web Assistant. You probably don’t need to change this.
Hours Collection Tab
Fill in the fields on the Hours Collection tab according to the explanations below.

How to show jobs: Whether to show station names or just job names and in which order.
How to collect hours: Whether you want your volunteers to enter their hours a month at a time or for single days at a time. If you set it By Month, it will default to the last day of a month. If you set it By Day, the volunteer or supervisor sets a specific day.
Hours allowed date range: How many days in the past and future can your volunteers enter hours? We suggest you leave days in the future to at least 31 so that they can enter hours using the last day of the current month if they are done serving already in this month.
Which information to collect: Put a check next to any piece of information you want to collect from your volunteers when they enter hours.
Manually approve hours limit: If you trust that your volunteers will accurately enter their hours, you can set a limit here that will save you from having to manually approve them before they are automatically entered into the Reporter data. For example if you set it at two hours, any volunteer who enters two or fewer hours will have their hours automatically entered into the Reporter when you do a Send & Receive. Any hours over two will be on the New Hours screen.
Months of past hours to show: When your volunteers log in to enter new hours, some of their past hours can be shown in order to remind them of what they have already entered. Here you choose how many months of past hours to show to them.
Job Postings Tab
Put a check next to each piece of information you want listed about job opportunities posted on the Web Assistant.
The Job Description comes from the Description tab in the Jobs section of the Reporter. You can choose to include just the first paragraph for a succinct description for the Web.

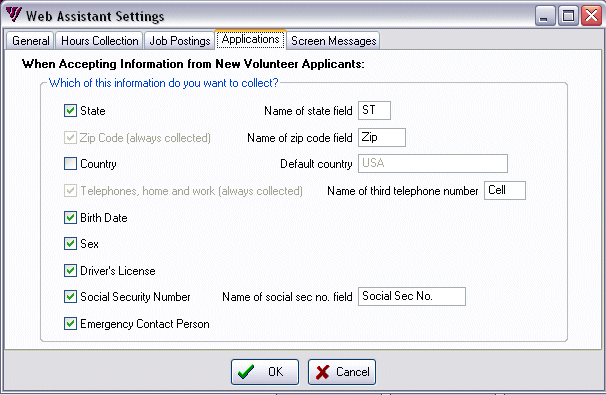
Applications Tab
Put a check next to each type of information you want to collect from new applicants. Note that the Web Assistant will always collect name, address, and phone, so you cannot uncheck those fields.
Screen Messages Tab
There are several standard messages shown on the Web Assistant. You can change the standard message to a customized message for your volunteers. For example, if a volunteer doesn’t know their password, you can change the message to “If you do not know your username or password, call Mary at 722-4522”.

Here are some customized messages that some organizations use. That’s up to you. We do recommend that you edit the Change Name/Password [3rd item] text to something like that given below.
| Message Name | Custom Text
|
| Login | If you do not know your username or password, please contact us. |
| Incorrect Name/Password | If you do not know your username or password, please contact us. You need a Placement before you can sign in. |
| Change Name/Password | Login with the password: volunteer. You MUST change your password the first time. Leave the username blank to keep it. Then logout and log back in with your new password. |
| Select Job for Hours | If you have served hours at a different job not listed below, please contact us. You can add hours consecutively for multiple jobs. You can’t add hours for jobs if you have no placements. |
| Hours Entry | Thanks for entering your hours. |
| Job Opportunities | Here are some current job opportunities that need volunteers. |
| Individual Job Description | Contact us if you are interested in this or any other job opportunity. |
| Application | We are always looking for new volunteers. Please apply here so that we can contact you. |
| Extra Application Information | Please enter any additional information we should know about you. |
Click OK to close the Settings.
Usernames & Passwords
Usernames Tab

Your volunteers log into the Web Assistant with a username and password. You control and change them from the Usernames & Passwords tab. On this tab you’ll see all of your volunteers listed. Initially, all of the usernames and passwords will be blank. You have two ways to assign usernames to volunteers.
- One is to assign them one at a time by clicking on the Edit button. This is useful if you only plan to have a few volunteers enter hours online.
- More commonly, you’ll use the Auto Assign button which will give each volunteer a username based upon their first and last names.
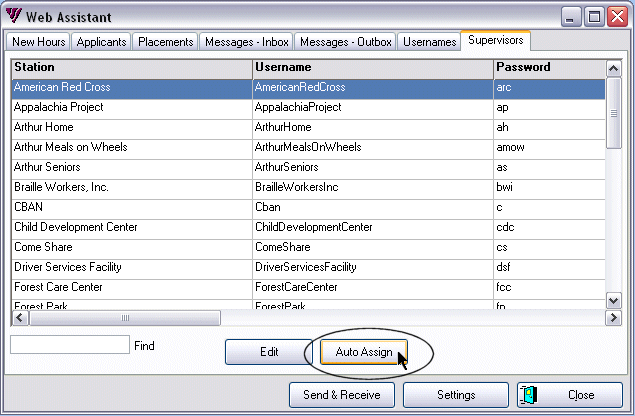
Supervisors
Supervisors Tab
Your station Supervisors can also log into the Web Assistant with a username and password so that they can enter their volunteers’ hours. You control and change their usernames and passwords from the Supervisors tab. On this tab you’ll see all of your supervisors listed. Initially, all of the usernames and passwords will be blank. You have two ways to assign usernames to supervisors, just like with your volunteers. The easiest way is to click the Auto Assign button and let the Reporter do the work.
Send & Receive
Uploading and Downloading Data
You will use the Send & Receive Wizard often to communicate with the Web Assistant server. Like with an email program, but in this case no communication happens with the Web Assistant server until you click on this button. For example, no settings you have changed or messages you have composed will be sent until you click on this button.
![]()
Note: Before you perform a Send & Receive, make sure all of your volunteers [and supervisors] have Placements in the Reporter and usernames in the Web Assistant so that they can login and enter hours online.
Click the Send & Receive button.

Click Next.
Send Volunteers Data
The Wizard enables you to send Volunteers’ names including their current passwords, placements, and recent hours. You can send all of your volunteers or you can filter the list if you only want some of your volunteers to be able to enter their hours online.
- The first time, and whenever you add or change volunteer or supervisor data, you check “Send a new list of volunteers and supervisors who can enter hours…”
- Usually you leave the filter at All Records, but you can use a filter to limit who is sent.
- Click Count & Prepare.
- Although it counts all your volunteers, those without placements will not be sent.

Click Next when it’s ready.

Send Jobs Data
The Wizard next enables you to send a list of Job opportunities to post on the web. Unlike when sending volunteers, you’ll probably want to filter the list of jobs often to include just certain jobs that you want to advertise. Whether you filter the list or not, you can choose what order the jobs will be listed in order to show more important or timely jobs at the top of the list.

To rearrange the order of your jobs list, click the Sort Jobs button.

Send Settings Data and Download Hours and Applications
Finally, the Send & Receive Wizard enables you to receive hours and applications as well as send and receive messages. You will normally leave these two checked so that you get the newest data entered by your volunteers. After you click on the Finish button, the Reporter will communicate with the Web Assistant server via the Internet and send and receive your data. Any data received will automatically be shown on the various tabs of the Web Assistant screen.

- Click Finish
- Watch the progress bars
- Ponder the description of the process

Click OK and you are done.

Firewall
Sometimes the first time you do a Send & Receive you receive a message that may look something like this.

If this happens, you must tell your firewall to always allow the Reporter to communicate, as this message shows.

Approving Data
Hours Tab
Any time you receive data from the Web Assistant server, it will be shown on the various tabs—New Hours, Applicants, and Placements. When you approve any of this data it is immediately entered into your Reporter data without any further data entry. For hours, only those above the limits you chose on the Settings screen wait for your approval. Hours under the limits are automatically entered into your Reporter data.
The Hours approval setting in the Settings section:
![]()

- Notice that the SentBy column indicates whether the hours were sent by a volunteer or a supervisor. You can scroll to the right to see more fields.
- Highlight one hours entry and click Approve.
- Or click Approve All to enter all hours into the database.
- You can also Edit the hours before you approve them to send them into the database.

- Before approving hours you can print By Job or By Volunteer.
- As with other reports you can preview, print, or export to another format.
Applicants Tab
When you approve applicants, the information from the online application is entered into volunteer data. If you want to change any of the information, approve it, then go to Volunteers and change it there.

- An X in the Msg column alerts you that the applicant sent a message.
- Click Read Message while that hours record is highlighted to open the Inbox tab so you can read the attached message.

- Select a message sender to read the message.
- Write a new message
- Reply to a message
- Or delete a message from this screen
You can use messages to communicate with your volunteers. When your volunteers enter hours they can also enter a message for you and you can reply to them. They’ll see your reply the next time they log in to the Web Assistant. If they entered a message along with hours that they entered, you’ll see an “X” in the “Msg” column on the New Hours tab. If you click on Read Message while that hours record is highlighted, it will pop you over to the Inbox tab so you can read the attached message.
This simple message system is not a replacement for email because your volunteers only get their messages when they log in to the Web Assistant. Also, there is no way to save or catalog messages. You can only read incoming messages, reply to them, and create new messages.
Placements Tab

Placements are jobs that either existing volunteers or applicants have expressed interest in. You can either approve them or delete them, one at a time. If it is a placement for a new applicant, you must approve the applicant before you can approve the placement.
After you have Approved data acquired from the Web Assistant, close the Web Assistant and view or edit the new records in the Volunteer Reporter.